Add Chat Feature to Demo of Amazon Chime SDK React Component Library
Note:
This article is also available here.(Japanese)
https://cloud.flect.co.jp/entry/2020/11/30/125920
In our last article, we posted a brief introduction to the Amazon Chime SDK React Component Library. At the time of writing, the latest update of this library, ver 1.5.0, added Chat-related components. I’m going to use it to add Chat functionality to an official AWS demo.
Like this.

Note: that this article is a bit complicated, using React coding. If you simply want to run the code, the URL of the repository is given at the end of this article, so you can get the code from there and run it.
At First
This time, we will add Chat functionality based on the demo provided by the official. First, make sure you have a working sample of ver 1.5.0, referring to the previous article.
Approach
Generally, the Amazon Chime SDK React Component Library provides React components as well as hooks and providers (Context APIs) that work behind the components to make it easier to use Amazon Chime’s features.
With the addition of the Chat-related components, I was hoping that they would provide providers or hooks to enable Chat functionality, but unfortunately, they haven’t yet. This issue says that you should implement it yourself with data messages for real-time signaling. Please refer to my previous article on data messages for real-time signaling.
So, I would like to implement a provider that uses data messages for real-time signaling by myself.
RealitimeSubscribeChatStateProvider
We will name the provider we will create as RealtimeSubscribeChatStateProvider. The following is a brief description of the content of the provider, in excerpts that we think are important. The entire source code can be found here.
Call userealitimeSubscribeChatState() of this provider so that you can refer to the Chat features and data.
Definition of State
Define the State (Chat function and data) provided by userealitimeSubscribeChatState(). If you just want to create a simple Chat function, the following two variables should be sufficient.
export interface RealitimeSubscribeChatStateValue {
    chatData: RealtimeData[]
    sendChatData: (mess: string) => void
}
The RealtimeData used in the interface is the actual data to be sent and received. In this article, we have defined the following data structure.
export type RealtimeData = {
    uuid: string
    data: any
    createdDate: number
    senderName: string
    //<snip>
}
useRealitimeSubscribeChatState()
The method to provide the above State is as follows: when creating a provider using the Context API, I think it’s almost formulaic, so I won’t describe it.
export const useRealitimeSubscribeChatState = (): RealitimeSubscribeChatStateValue => {
    const state = useContext(RealitimeSubscribeChatStateContext)
    if (!state) {
       // handle exception
    }
    return state
}
Definition of Provider
Sending and receiving data messages for real-time signaling is done by AudioVideoFacade. You can get a reference to this AudioVideoFacade with useAudioVideo() (1–1), and you can get the username with useAppState() (1–2). The user name can be retrieved with useAppState() (1–2). The Chat text data is managed by this provider using useState. (1–3)
In (2–1), we define a data transmission function using data messages for real-time signaling. We call the method of audioVideo (AudioVideoFacade) to send the data. In this time, we specify “CHAT” because we can specify the topic (2–2). Also, since the sender can’t receive the sent data , you should add the sent data to the Chat text data after sending(2–3).
useEffect registers (and deletes) a function for receiving data messages for real-time signaling (3–1), (3–2). The receive function itself just parses the received data and adds it to the text data of Chat, as shown in (3–3).
export const RealitimeSubscribeChatStateProvider = ({ children }: Props) => {
    const audioVideo = useAudioVideo()           // <----- (1-1)
    const { localUserName } = useAppState()   // <----- (1-2)
    const [chatData, setChatData] = useState([] as RealtimeData[]) // <----- (1-3)

    const sendChatData = (text: string) => {  // <----- (2-1)
        const mess: RealtimeData = {
            uuid: v4(),
            data: text,
            createdDate: new Date().getTime(),
            senderName: localUserName
        }
        audioVideo!.realtimeSendDataMessage("CHAT" as DataMessageType, JSON.stringify(mess)) // <----- (2-2)
        setChatData([...chatData, mess]) // <----- (2-3)
    }

    const receiveChatData = (mess: DataMessage) => { // <----- (3-3)
        const data = JSON.parse(mess.text()) as RealtimeData
        setChatData([...chatData, data])
    }

    useEffect(() => {
        audioVideo!.realtimeSubscribeToReceiveDataMessage(    // <----- (3-1)
            "CHAT" as DataMessageType,
            receiveChatData
        )
        return () => {
            audioVideo!.realtimeUnsubscribeFromReceiveDataMessage("CHAT" as DataMessageType) // <----- (3-2)
        }
    })

    const providerValue = {
        chatData,
        sendChatData,
    }
    return (
        <RealitimeSubscribeChatStateContext.Provider value={providerValue}>
            {children}
        </RealitimeSubscribeChatStateContext.Provider>
    )
}
GUI
Next, I’m going to go over the part that displays the Chat screen. Here is another excerpt of what we think is important.
Adding RealitimeSubscribeStateProvider
Modify the DOM of MeetingView to allow the above created providers to be used in the conference room. Add a real-timeSubscribeStateProvider to the (1) part. This will allow the Chat feature to be used in the subordinate Views.
const MeetingView = () => {
  useMeetingEndRedirect();
  const { showNavbar, showRoster, showChat } = useNavigation();

  return (
    <UserActivityProvider>
      <StyledLayout showNav={showNavbar} showRoster={showRoster || showChat}>
        <RealitimeSubscribeStateProvider>          // <--- (1)
          <StyledContent>
            <MeetingMetrics />
            <VideoTileGrid
              className="videos"
              noRemoteVideoView={<MeetingDetails />}
            />
            <MeetingControls />
          </StyledContent>
          <NavigationControl />
        </RealitimeSubscribeStateProvider>
      </StyledLayout>
    </UserActivityProvider>
  );
};
ChatView
In (1), we get the chat data and a reference to the data sending function using the userealitimeSubscribeChatState() we created earlier. In (2–1) and (2–2), we use the Chat component of the Amazon Chime SDK React Component Library to generate the display part (more on this later). (3) calls the send function of the chat data.
const ChatView = () => {
  const { localUserName } = useAppState()
  const { closeChat } = useNavigation();
  const { chatData, sendChatData } = useRealitimeSubscribeChatState()  // <---- (1)
  const [ chatMessage, setChatMessage] = useState('');

  const attendeeItems = []
  for (let c of chatData) {                      // <---- (2-1)
    const senderName = c.senderName
    const text = c.data
    const time = (new Date(c.createdDate)).toLocaleTimeString('ja-JP')
    attendeeItems.push(
      <ChatBubbleContainer timestamp={time} key={time+senderName}>   // <---- (2-2)
        <ChatBubble
          variant= {localUserName === senderName ? "outgoing" : "incoming"}
          senderName={senderName}
          content={text}
          showTail={true}
          css={bubbleStyles}
        />
      </ChatBubbleContainer>
    )
  }

  return (

    <Roster className="roster">
      <RosterHeader title="Chat" onClose={()=>{closeChat}}>
      </RosterHeader>
      {attendeeItems}
      <br/>
      <Textarea
        //@ts-ignore
        onChange={e => setChatMessage(e.target.value)}
        value={chatMessage}
        placeholder="input your message"
        type="text"
        label=""
        style={{resize:"vertical",}}
      />
      <PrimaryButton
        label="send"
        onClick={e=>{
          setChatMessage("")
          sendChatData(chatMessage)    // <---- (3)
        }}
      />
    </Roster>
  );
}
The rest you have to do is enable this ChatView to be displayed from a navibar. The display from the navibar is not essential in this case, and it contains several minor modifications, so I will not describe it. Please check the changes from the repository’s commit log.
Run
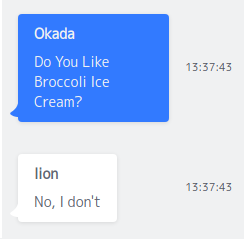
Now, let’s see how it works. If you type a message like this, you’ll see a message on your screen with the other person.
For your own message (which has an outgoing variant attribute), it will be a blue speech bubble. For other messages, it will be a white speech bubble.
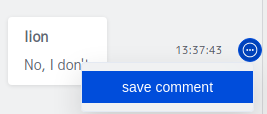
You can toggle the display of the balloon’s tail (which, in cartoon terms, indicates where the balloon originates) by using the tail attribute, but you can’t change its direction.

Otherwise, you can omit the time or add action buttons.
Repository
You can find the source code for this one in the “chat_feature” branch of the following repository
You can launch it in the same way as the way we ran the demo in the previous article, so check out how it works.
Finally
This is a look at adding chat functionality to the official Amazon Chime SDK React Component Library demo. Although I had to touch the raw Amazon Chime SDK a bit, I was able to create a chat GUI that was consistent with the other components without too much effort.
In addition to the chat function introduced here, the following repositories provide a version with a whiteboard function. Also, Cognito integration and virtual backgrounds are implemented in the following repositories.
- Virtual Background
- Whiteboard