Note:
New related post have been published.
How to bundle WebWorker in npm package
I recently created an npm package for Virtual Background. This was the first time in my history to make an npm package.
This time, I’ll try to package the barcode detection part (SemanticSegmentation) of the multi-barcode reader that I created before.
I had made this barcode detection part with webworker. I don’t know how to make a npm package which uses webworker even if I search a lot. I made it by trial and error and I could make it works for the time being. The following is a reminder of that content.
I’m not sure if this is the official way, because I made it work after trial and error. If you find something wrong, please let me know.
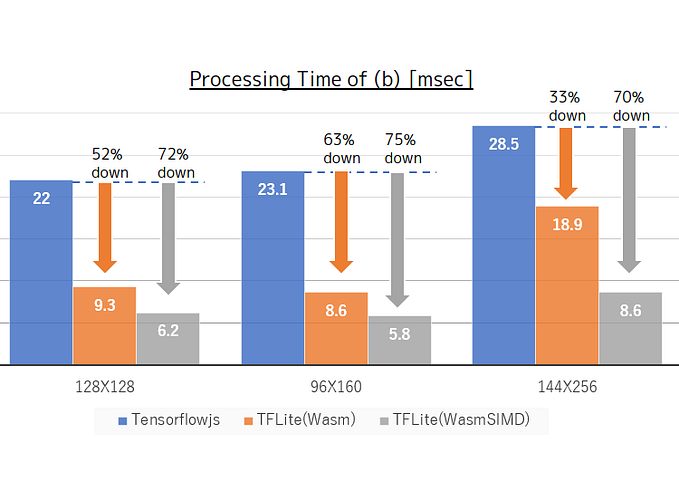
What we’re going to package is a semantic segmentation of a large image by dividing into small pieces. By parameterizing the number of pieces, it allows for a trade-off between accuracy and speed. I’m thinking it would be more effective if used on a device with limited performance, such as a smartphone.
The behavior is like this. If you split the screen, the accuracy of Segmentation goes up, but the speed goes down.

Premise
- Make a npm account.
- Create a github account and repository.
- Clone your git repository and move to that directory.
Workflow
First, let’s configure and log in to npm.
$ npm set init.author.name "xxxxxx"
$ npm set init.author.email "xxxx@xxxx.co.jp"
$ npm set init.author.url "https://qiita.com/wok"
$ npm adduser
Now, let’s initialize project and install the packages and webpack needed for project.
npm init -y
npm install --save-dev webpack webpack-cli
npm install --save-dev typescript ts-loader
npm install -D tsconfig-paths
npm install -D rimraf npm-run-all
Initialize tsconfig.json and set the necessary items.
In this case, we enable type declaration and source map generation. We also set the output to . /dist.
If you don’t need to generate a source map, don’t create it.
npx tsc --init

$cat tsconfig.json
<snip>
"declaration": true,
"sourceMap": true,
"outDir": "./dist",
Next, set the webpack.
Here we use the same name for (1) entry and (2) filename as the package name. This is one of the results of trial and error.
I created a webworker using the worker-plugin this time, but I couldn’t figure out how to put the webworker into main script file. As a result, I created the webworker script as a separate file and have it manually placed directly under public. (Installation scripts are provided.)
If you create a webworker using the worker-plugin, the filename of webworker inherits the main script name. For example “0.scalable-semantic-segmentation.worker.js” To make sure that the name of the file is not the same as the name of existing file in the public, we use package name for the filename.
$ cat > webpack.config.js
const path = require('path');

module.exports = {
    mode: 'development',
    entry: './src/scalable-semantic-segmentation.ts', // <-- (1)
    resolve: {
        extensions: [".ts", ".js"],
    },
    module: {
        rules: [
            { test: /\.ts$/, loader: 'ts-loader' },
        ],
    },
    output: {
        filename: 'scalable-semantic-segmentation.js', // <-- (2)
        path: path.resolve(__dirname, 'dist'),
        libraryTarget: 'umd',
        globalObject: 'typeof self !== \'undefined\' ? self : this'
    },
};
You need to change the main package.json file according to the webpack settings. Also, we need to set up the script.
"main": "dist/scalable-semantic-segmentation.js",
  "scripts": {
    "test": "echo \"Error: no test specified\" && exit 1",
    "webpack": "npx webpack --config webpack.config.js",
    "clean": "rimraf dist/*",
    "build": "npm-run-all clean webpack"
  },
Next, install the worker-plugin.
npm install -D worker-pluginEdit webpack.config.js to enable worker-plugin.
Add parts (1) and (2).
const path = require('path');
const WorkerPlugin = require('worker-plugin'); // <--- (1)
module.exports = {
    mode: 'development',
    entry: './src/scalable-semantic-segmentation.ts',
    resolve: {
        extensions: [".ts", ".js"],
    },
    module: {
        rules: [
            { test: /\.ts$/, loader: 'ts-loader' },
        ],
    },
    output: {
        filename: 'scalable-semantic-segmentation.js',
        path: path.resolve(__dirname, 'dist'),
        libraryTarget: 'umd',
        globalObject: 'typeof self !== \'undefined\' ? self : this'
    },
    plugins: [                                  // <--- (2)
        new WorkerPlugin()
    ]
};
As mentioned above, this time we have created the webworker as a separate script from the main script. You need to copy this to a public dirctory (under the root of the web). Create a script that does this and place it in the bin directory.
const fs = require('fs');
const path = require('path');
const package_name = 'scalable-semantic-segmentation-js'
const src = path.join('node_modules', package_name, 'dist', '0.scalable-semantic-segmentation.worker.js')
const dst = path.join(process.argv[2], '0.scalable-semantic-segmentation.worker.js')

try {
    fs.copyFileSync(src, dst, fs.constants.COPYFILE_EXCL);
    console.log('file is copied');
  } catch (error) {
    console.log(error);
  }
Now we need to create a “.gitignore” and a “.npmignore”.
$ cat > .gitignore
*~
*#
node_modules
dist

$ cat > .npmignore
*~
*#
node_modules
demo
src
All that’s left is to create the source code, build it, publish and you’re done.
npm publishOutput