Live streaming system for multiplayer games, with Among Us Auto Mute, with Amazon Chime SDK JS
Note:
This article is also available here.(Japanese)
https://cloud.flect.co.jp/entry/2021/07/21/113845
Introduction
The Olympic Games are just around the corner, and e-sports is starting to get a lot of attention in the digital world. In a related vein, I’d like to use Amazon Chime SDK JS to create a live streaming system for multiplayer games. In particular, I’d like to focus on the subject of Among Us, where the official policy on fan creation is very clear.
Specifically, we will create something like the figure below. Each user’s game screen is displayed in the center. We need to make this screen visible to the audience, but invisible to the players. The audio should be automatically muted/unmuted depending on the situation as well. We will use the unique features of Amazon Chime SDK JS to make this possible.
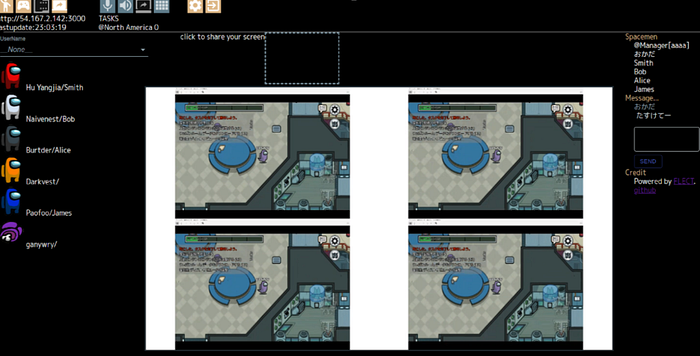
Among Us and “Discussion”
Among Us has been explained in many places, so I won’t explain it in detail here. As a rough outline, it is a derivative of the werewolf game as it is also known as Space Werewolf.
Four or more users participate in the game, and they are divided into two groups: Imposter, who plays the wolf, and Crew, who plays the villager. The Crew does not know who the Imposter is. Crew performs various tasks that arise in the spaceship, such as repairing the spaceship. On the other hand, Imposter, pretending to be true Crew, interferes with them and kills the real Crew.
If the Imposter reduces the number of Crew survivors to the same number as the Imposter, the Imposter wins; if the Crew completes all tasks before the number of survivors is reduced, or finds the Imposter and banishes him from the spaceship, the Crew wins. In order for the Crew to banish the Imposter, they need to gather all the surviving players and hold a discussion to find out who the Imposter is. Note that players can only communicate with each other during the discussion.
AutoMuteUs and Our Live streaming System
Normally, discussions are done via text chat, but in order to hunt down the Imposter, it’s more interesting to have voice discussions (my personal opinion). In response to such requests, a number of volunteers have developed a system that allows voice chat only during discussions in conjunction with the game. There are several systems like this, but I think the most famous one is called AutoMuteUs.
AutoMuteUs is a Discord bot that uses Discord’s features for voice chat. AutoMuteUs uses a program called AmongusCapture to read the game state of Among Us. And it sends the read game status to a bot (AutoMuteUs) on Discord to control the voice chat on/off.
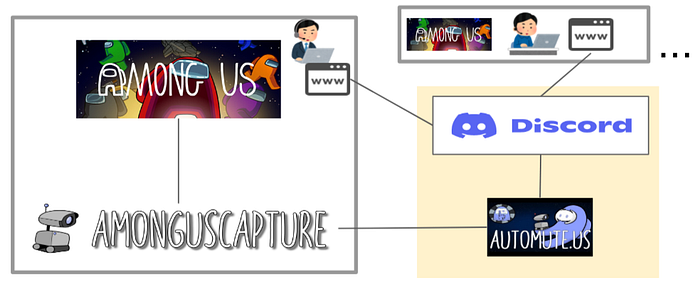
We’ll replace the Bot part of AutMuteUs with a program that uses Amazon Chime SDK JS to create a live streaming system.
Control Screen Sharing and Voice Chat
Since this is a live streaming system using Amazon Chime SDK JS, we need to make it so that audience can receive the game screen and audio in addition to the players.
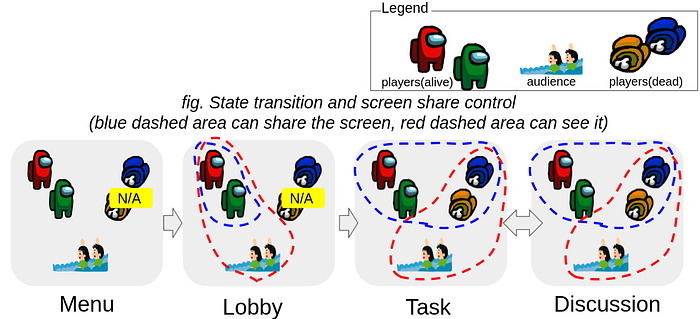
As shown in the figure below, we want to be able to see each user’s screen.
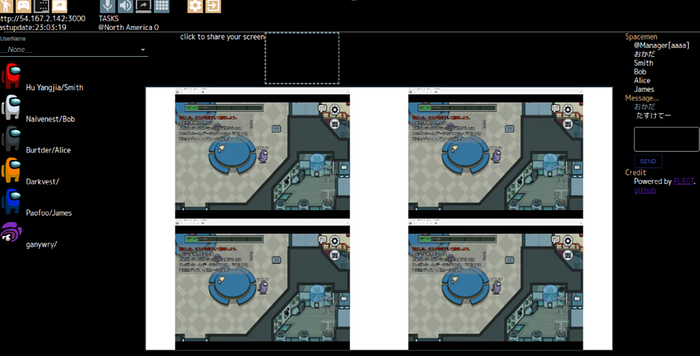
In this time, we will define in which situation each user (player and spectator) can see the screen as follows. Users with blue dotted lines can share the game screen. Users with the red dotted line can see the shared screen. In the Menu and Lobby stage, there is no such thing as a dead player. In the Lobby stage, all users can see the shared screen. During Task stage and Discussion stage, only audience and dead users can see the shared screen.
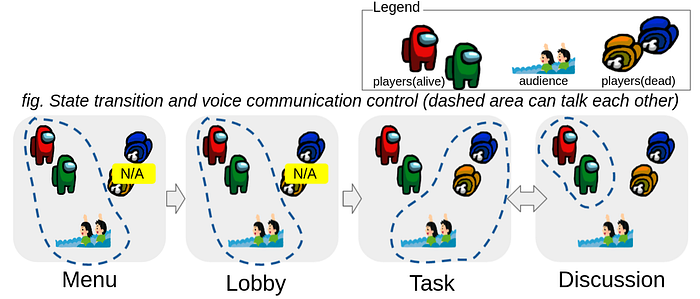
For voice, we define as follows. The dotted line is the area where voice chat will be enabled. In the Menu stage and Lobby stage, everyone can voice chat. Only audience and dead users can voice chat during Task stage. During Discussion stage, only alive players can voice chat, while audience and dead users can listen to the voices of alive players.
Implementation
In order to implement the system, a lot of configuration and creation is required around authentication, S3, Lambda, and so on. Since I can’t write about all of this, I’ll focus on the following two unique points that are necessary for a live streaming system.
- Sharing of 15 users game screens
- Video and audio control in conjunction with games
I would like to explain the other parts in another article if necessary when I get a chance. If you are interested in the configuration of the backend, please check the following document for an overview. (description v.01)
Sharing of 15 users game screens
For this system, we need to deliver game screens in addition to voice.
Amazon Chime SDK JS provides a screen sharing feature, but it is limited to 2 streams per meeting, and since there are currently up to 15 players in Among Us, it is not possible to share the screen for everyone. On the other hand, up to 16 streams for video (one stream per user) can be used per meeting (ref). Also (and this is a very nice feature of Amazon Chime SDK JS that I’ve been highlighting a lot), MediaStream can be used for video streams in addition to webcam video. This means that you can use getDisplayMedia to get a MediaStream from the game window and populate the video stream with it. In this case, we will use this method to share the game screen.
Of course, you will not be able to share webcam video, since the video stream of each user will be used.
Video and audio control in conjunction with games
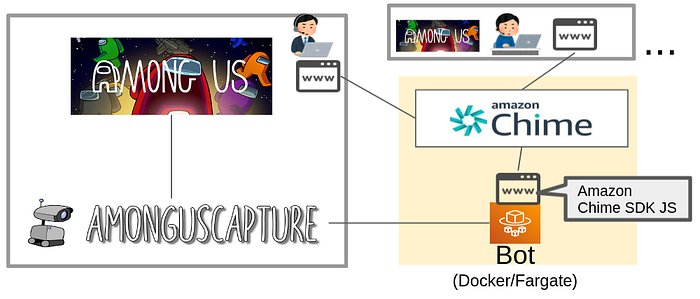
As with AutoMuteUs, the game state is received from AmongusCapture by a bot created using Amazon Chime SDK JS. Based on this received information, it is necessary to control the On/Off of video and audio. In this case, we will use the Realtime Signaling Data Message sending function provided by Amazon Chime SDK JS to achieve this.
The flow is as shown in the figure below.
(1) First of all, the game state of Among Us is captured by Among Us Capture as well as AutoMuteUs, and sent to the Bot program on Fargate. (2) This Bot program controls the browser (Chrome) using puppeteer, and can notify the browser of the received game status. (3) The Amazon Chime client running on the browser sends the received game state to each client using the Data Message sending function of Reatime Signaling. Each client controls the mute/unmute of microphones and speakers and the on/off of screen sharing according to the game status.
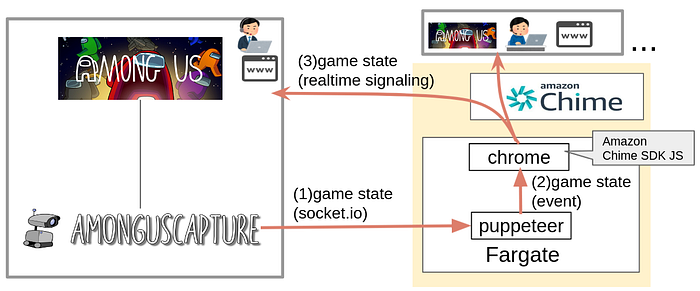
In this case, the bot is created as a Docker image and run on Fargate.
Demo
The live streaming system described in this article is stored in the repository below.
https://github.com/w-okada/flect-chime-sdk-demo
In this live streaming system, we will build the backend with a script using CDK, which is very easy to deploy if you have an AWS account. Let’s take a look at the deployment process.
Note: This system uses AWS resources for the backend, so there will be a cost. The main charges are for Fargate and Chime.
Prerequisites
(1) Setup AWS Credentials
We will build a backend in AWS. For this reason, it is assumed that you have set up your AWS credentials before deploying. For more details, please see here.
(2) Install AWS CLI
We will use AWS CLI. For this reason, it is assumed that you have installed AWS CLI. For more information, please see here.
Procedure
(1) Clone the repository
In this article, we will use the version with the blog001-multi-gameplay branch, so please specify the blog001-multi-gameplay branch and clone.
$ git clone https://github.com/w-okada/flect-chime-sdk-demo.git -b blog001-multi-gameplay
$ cd flect-chime-sdk-demo/
(2) Configuration
Specify the CloudFormation stack name for the backend we will build in backend/bin/config.ts. This stack name can be anything you want, but it must be globally unique since we will be creating an S3 bucket with this name as the prefix.
$ cat backend/bin/config.ts
export const BACKEND_STACK_NAME = 'amongus-blog-demo-xxxxx' # <-- You should change.
export const FRONTEND_LOCAL_DEV = false # <--- Keep it
export const USE_DOCKER = false  # <--- Keep it
export const USE_CDN = true # <--- Keep it
(3) Build backend & Deploy
First, let’s build the backend. As mentioned earlier, we will build it using a script that uses CDK, so you can complete the build by executing the following command. The process will take a few minutes.
$ cd backend
$ npm install
$ npm run build_all
(4) Build frontend & Deploy
The next step is to build and deploy the frontend. Execute the following command to build it.
$ cd frontend4
$ npm install
$ npm run build
After the build is completed, deploy it.
$ sh sync.shThis completes the build and deployment. Now, let’s try to use it.
Run the Demo
The URL of the deployed sample application can be found in demo_url.txt. Please access it with a browser.
$ cat demo_url.txtWhen you access the site with a browser, a screen like the one on the left below will appear. Click on the “Among Us” banner at the bottom of the screen to switch to the screen on the right.
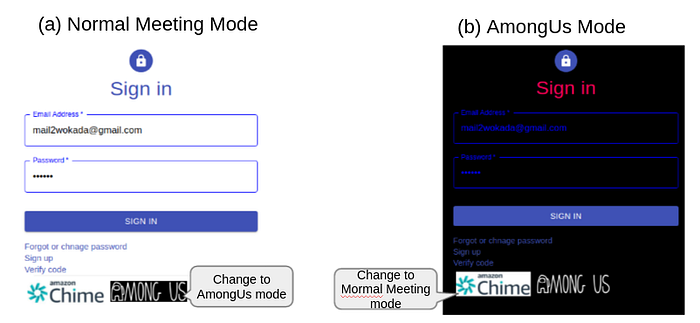
Thereafter, you will need to sign up and then sign in. Please refer to the manual below for details on subsequent steps. (manual v.01)
Finally
In this article, I tried to create a live streaming system for multiplayer games with Amazon Chime SDK JS. I think the following two features made it fairly easy to implement the system.
- MediaStream can be used to stream for video cameras.
- Built-in communication channel (WebRTC’s Signaling) can be used for data communication between clients.
We believe that these features provide a high degree of scalability and flexibility, not only for live game distribution systems, but also for a variety of other systems and applications.

Disclaimer
Recording or capturing Amazon Chime SDK meetings with the demo in this blog may be subject to laws or regulations regarding the recording of electronic communications. It is your and your end users’ responsibility to comply with all applicable laws regarding the recordings, including properly notifying all participants in a recorded session, or communication that the session or communication is being recorded, and obtain their consent.
